
Interview with Sergei Chapek: The Design of 3D Printed Micro Fluidics
With the development of clear and chemical resistant materials for photopolymer systems such as DLP, SLA and polyjet, the design and manufacture of microfluidic mixers has seen on the rise over recent years. The combination of fast iteration and production during the design and prototyping stage, as well as the design freedom and complexity enabled with additive manufacturing makes for a compelling argument for the adoption of AM, and cool gifs of moving colors.
I have been following Sergei Chapek’s work for a while and wanted to learn more about how he got started, what he is working on and what he sees coming up next in the world of 3D printed micro fluidics.

Q.
Hey Sergei, can you tell us about yourself and the research you are doing into designing microfluidics.
A.
My name is Sergei Chapek, head of a microfluidic lab that builds technology for doing chemical and biological research with microfluidic and additive manufacturing methods. I graduated from Law Faculty in 2007, but currently I’m doing my PhD in Physics….. So I have quite interdisciplinary experience.
Essentially I consider myself and my team as research tools builders.
Also my team is developing dosing systems as well as microfluidic devices.
Currently we are developing 3D printed microfluidic devices for nanoparticle synthesis for research groups and industrial partners.
Q.
When did you first consider AM for microfluidics and how did you first approach it as a design problem?
A.
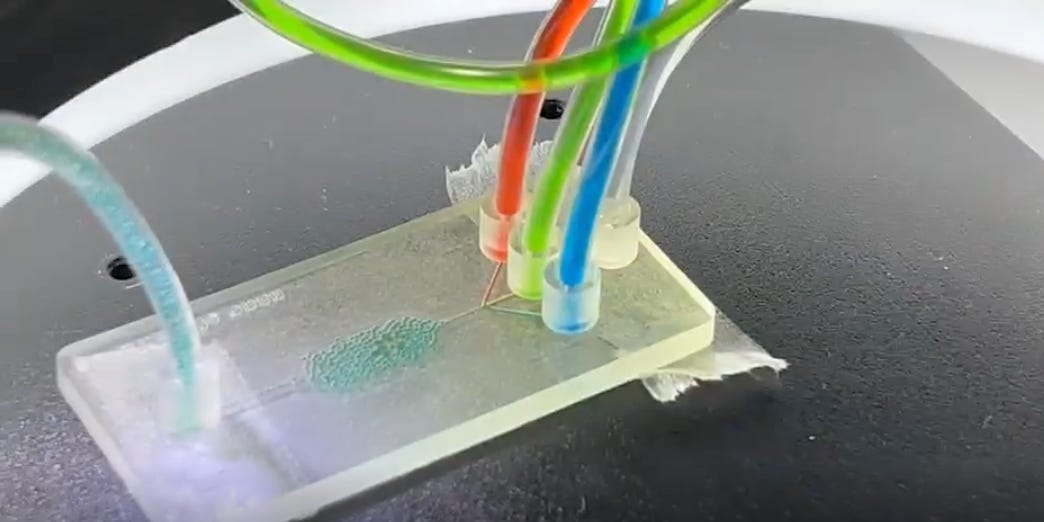
At the end of 2021 I started to develop our 3D printed microfluidic devices, we found that truly microfluidic devices are possible with DLP/SLA technology, also it is possible with PolyJet 3D printers, but they are quite pricey. So, we purchased ASIGA UV MAX as well as all available transparent resin on the market and started a wonderful trip into the 3D printed microfluidic device world.
We chose 3DP as a fast chip alternative to traditional PDMS technology. Moreover, PDMS technology often requires a cleanroom environment.

Q.
Can you tell us a little more about the design process itself, how you create the mixing geometries?
A.
There are 4 stages of modeling.
1) Concept development (usually a brainstorming session with a team of chemists/biologists) depending on the reaction. Choosing the type of microfluidic device (continuous flow or droplet generator)
2) Creating a CAD model and, if necessary, simulating flows in Comsol.
3) The mandatory stage is 3D printing of the prototype and its testing. (checking the tightness of the joints, resistance to solvents and temperature)
4) The final stage is 3D printing of several chips and launching the planned reaction.
Q.
Do you use any simulation tools to drive or predict the outcome of the geometries?
A.
Yes, sometimes we use COMSOL Multiphysics® to simulate Droplet Generation.
Q.
What are the outcomes of the geometric freedom additive manufacturing microfluidics gives you over other methods, and what are the downsides?
A.
The main advantage is the speed of production.
It takes on average 20 minutes to print 3DP microfluidics, which is very fast compared to any available production methods for microfluidic devices. For instance, in 1-2 hours you can design, produce and test your model. Moreover, it is possible to start a microfluidic experiment right after your 3D printing is finished. So, it is super quick. In addition, it is super easy to make any changes to your CAD mode and reprint your device.
Of course, there are also some disadvantages in the use of 3D printed microfluidic devices. Perhaps the most important disadvantage is the problem of chemical resistance of the resins from which the chips are made, as well as temperature resistance. However, the active development of this technology and a large amount of research in the field of 3D printed microfluidic devices, I think, will solve all these problems by developing new, special resins etc. because already you can have chemical stable non-transparent resin.

Q.
On the bioprinting side, how do you decide, define and design the scaffolds?
A.
9 out of 10 scaffolds are just a grid with different distances between the extrusion lines and several layers in height.
3D bioprinting can be divided into 3 main stages.
Pre-bioprinting, Bioprinting and Post-bioprinting key parameters are determined at each stage.
These stages are applicable both for micro-extrusion and DLP technology of printing scaffolds, which actively is gaining popularity in bioprinting, since there is a possibility of 3D bioprinting with the maximum degree of geometric biomimicry.
Of course, the printing of transplantable organs is still very far away.

Q.
What are you planning on focusing on next and will it build on the design of geometries of bioprinting and microfluidics?
A.
One of the projects I am currently working on is the development of a 3DP microfluidic printing heads for bioprinting with the possibility of obtaining droplets with cells and mixing them with hydrogel for bioprinting (in-situ).

I would like to thank Sergei for his time in sharing more about his use of 3D printing in his research. You can follow his progress on Linkedin where he regularly posts videos of his research along with open source 3D files of some of his mixers can be downloaded from Grabcad.